
Behind the scences | Segment extreme
What is this?
This section is a short walkthrough that will hopefully help you fine-tune the segmentation process, if you find that the straightforward way does not provide enough segmentation power.
It assumes that you've had a quick read of the main segmentation page, or even better, you are familiar with photoQuad.
2,545 segments are not enough! Gimme more..
We could, but where should we stop, how many gigabytes of RAM should we require from your PC, and how long should we keep you looking at this thing?
Benthic images can be extremely complex and diverse, and if that wasn't enough, they tend to be large. Image segmentation can drain a computer's memory for a medium-sized image, let alone for a high-resolution one that is segmented into multiple scales of increasing detail (as applied in photoQuad). Ontop of that, add the time that the user must wait for the software to perform the process.
Suppose that all these problems are solved; unavoidably, this question arises when developing the software:
If a true-color digital image with dimensions 4000x3000 pixels has 12,000,000 pixels of different color, should we provide the user with 12,000,000 segments to work with?
It is an exaggerated scenario that does no justice to the highly-elaborate methods of segment grouping, but there is some truth in it on a practical level. So let's simplify the scenario, and suppose that after careful adjustment of the input parameters for a particular image, the process ended up with 2,545 segments, demonstrating the outstanding abilities of photoQuad in image segmentation. Now comes the killer question:
Even if it's only 2,545 segments, how do we build a user interface that is not a nightmare to operate?
The issue here is that as users, our problem is not abstract or academic, it's practical: we use photoQuad on our home PC to analyze a diverse range of benthic images, and we need to do it reasonably fast, without having to sit 30 hours of University classes on advanced image processing before being able to produce a species region.
So the best approach we could think of in this scenario is "balance".
This means that eventually we had to stop segmenting, and reduce the number of input parameters the software requests from the user. The complexity was moved to the development side: we carefully tweaked photoQuad's internal settings to produce optimum results in a range of image complexity scenarios, while being able to run on an average home PC.
That's good to know. But still, 2,545 segments are not enough!
That's what this walkthrough is all about:
Step 1) source image
As a source image, this walkthrough uses one of the demo images provided with photoQuad's download, namely the demoQuad2.jpg (Figure 1 below). This way you can repeat the experiment and reproduce the results.

Figure 1. The source image, showing only a portion of it (www-friendly)
Step 2) reminder
Interestingly enough, we have reduced the user-controls of a sophisticated segmentation algorithm into a single checkbox. However, this does not compromise photoQuad's versatility; please continue the walkthrough..
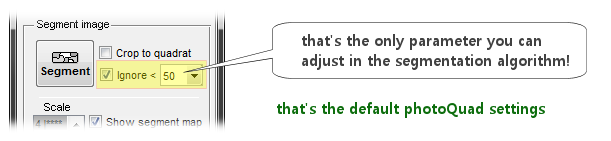
Step 3) Default segmentation
Using the default settings, this image is not adequately segmented, even when viewed at the highest segmentation scale 4 (Figure 2). The reason is that in this particular frame, most part of the substrate has the same brownish colors.
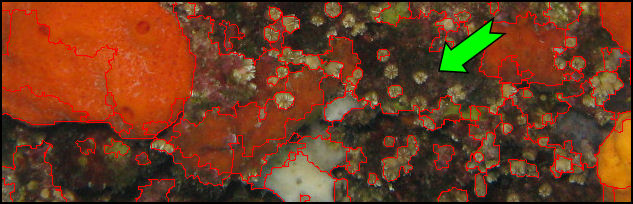
Figure 2. Segmentation boundaries at scale 4 (highest detail), using the default settings. The green arrow indicates one of the problematic areas.
Step 4) Disable the minimum segmentation threshold
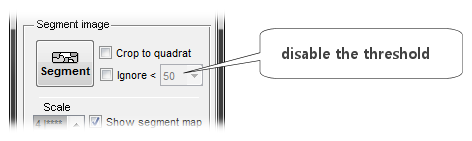
The minimum segmentation threshold indirectly controls how much the image will be segmented, because it works as a cut-off filter. It defines the minimum possible size of produced segments, measured in pixels. So a value of 50 means that photoQuad will not produce any segment of 49 or less pixels. For most images, the threshold prevents photoQuad from over-segmenting the image, i.e. producing a segment map with numerous tiny regions that are practically useless. Not in this case though... Disabling the threshold produces the result shown in Figure 3.
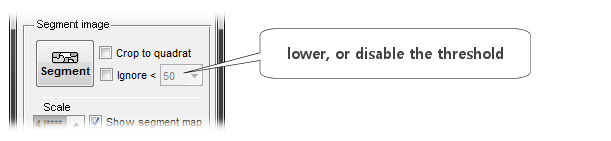
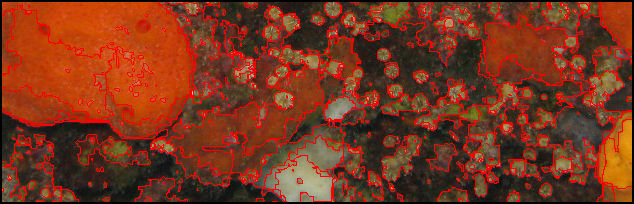
Figure 3. Segmentation boundaries at scale 4 (highest detail), with the minimum segmentation threshold disabled. Please compare this Figure with Figure 2 above.
Step 5) Segment extreme
The minimum segmentation threshold is the only parameter controlled by the user. So if it's disabled and the image is analyzed at scale 4 (highest detail, Figure 3), one would expect that we've reached the maximum segmentation power of photoQuad.
No.
Here's one of the tricks available, and it uses a combination of the several utility tools available in photoQuad. The snapshot tool and the image decorrelation tool. The idea is that instead of working on the original image, we'll produce one that won't look as good, but it's much better for segmentation.
Follow these steps:
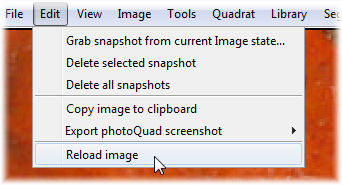
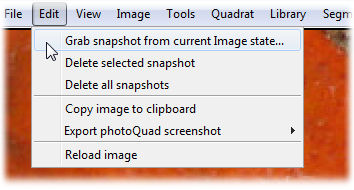
Go to the "Edit" menu, and select "Reload image". This will reset all work done on this image.
On the segmentation panel, leave the minimum segmentation threshold disabled, exactly as in Step 4.
Go to the "Image" menu, and select "Decorrelate.."
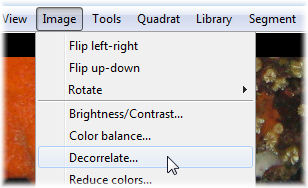
On the decorrelation window, use the default decorrelation method and set the tolerance low, e.g. 0.04
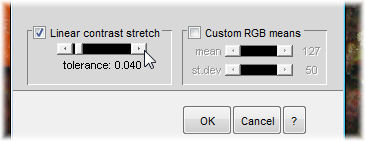
Figure 4 illustrates the decorrelated image. It looks odd, but...
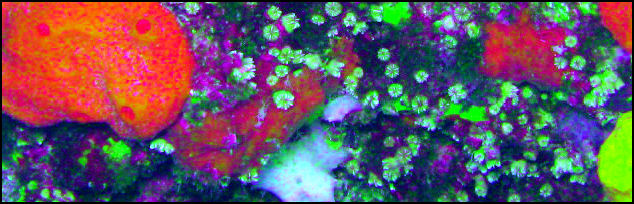
Figure 4. Decorrelated image.
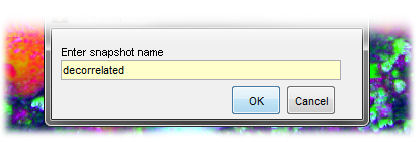
Go to the "Edit" menu, and select "Grab snapshot from current image state..."
..and name the snapshot so that it makes some sense.
Now take a look at the "Snapshots" tab, situated at the bottom of photoQuad's floating interface. Click on the "decorrelated" snapshot. It is important that this is the selected entry in the snapshots tab!
The reason is that when you press the "Segment" button, photoQuad actually uses the color data of the selected snapshot. By default, it is the [ROOT] snapshot that is selected, i.e. the original image itself. By grabbing a snapshot and selecting it as described here, you force photoQuad to segment this snapshot, not the original image!
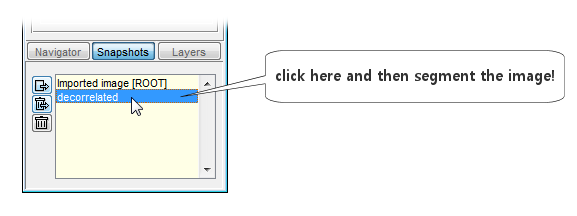
Figure 5 shows the results of the segmentation process, displaying them at scale 4 (highest detail).

Figure 5. Segmentation boundaries at scale 4 (highest detail), with the minimum segmentation threshold disabled, and segmentation performed on a decorrelated image.
Reminder: Figure 5 above and Figure 3 are all segmented with the same settings... which is actually one: the minimum segmentation threshold was disabled. The only difference was that we segmented a color-variation of the original image, using some of the various tools available in photoQuad. Following is Figure 3 again for comparison:
extra tip: After segmentation, click the [ROOT] snapshot on the "Snapshots" tab. This will bring back the original image colors, while allow you to continue working on the segment product of the decorrelated image!
